Tamiya 1/20 Tyrrell P34 Six Wheeler

The Tyrell P34 was the first and last six wheeled car to have raced in Formula 1. It raced during the 1976 and 1977 Grand Prix seasons, where it finished third and sixth, respectively, in the manufacturers championship. It won one race, the 1976 Swedish Grand Prix with Jody Scheckter at the wheel, with Patrick Depailler in the other P34 coming in second. The idea behind the car was to reduce frontal drag by using smaller size tyres. To make up for the loss of grip, the number of front tyres was doubled. The 1977 car was modified into the more stream lined P34B, but there was no development of the front tyres to keep up with the rest of the field. The P34 used the 3 litre Ford-Cosworth DFV V8.
The Kit
This is Tamiya's first 1/20 Formula 1 kit, released in 1977. Previous to this Tamiya had released other 1/12 Formula 1 models, including the P34. The kit of the 1976 P34 has 187 parts and is incredibly detailed. The engine, transmission, front and rear suspension are fully detailed. The chassis unfortunately includes a compartment for one AA size battery, presumable for a motorised version of the kit. This makes getting a nice flat undertray without any holes very difficult. I suspect this is the reason why the new 1/20 scale was chosen, as the more common 1/24 scale would have been too small. This is similar to how Tamiya created 1/35 scale with its motorised Panther tank in 1961.
 |
Tamiya's famous white box artwork. |
My brother bought this kit for me in 1981, during my last year in high school. Previous to this I had built the Tamiya 1/20 Ferrari 312B and Renault RE20. I had started on the engine and transmission, but feeling burnt out after completing the Ferrari and Renault, they were put back in the box where they sat for 25 years. I finally got round to finishing the kit in 2006 and after 9 months, the model was finally completed!
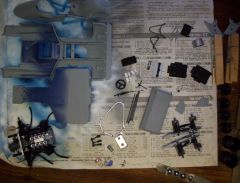
 |
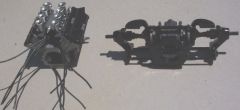
The parts, also showing the partly completed engine and transmission from 1981. |
The kit has a number of sink and punch marks. There was a small sink mark on the body, with the rest of the sink marks on the engine. There are plenty of punch marks to fill in on the engine, and underneath the body and above the chassis. Most of these marks can be ignored if you want, but as they can be seen if you know where to look, I filled them all in. After 25 years, the decals showed absolutely no sign of ageing. However, alignment is not perfect and is noticeable if you look close.
Assembly and Painting
Except for filling in the sink and punch marks, assembly is quite straight forward. The battery compartment lid was glued into the chassis. The hole for the switch was filled in with plastic card. Multiple applications of filler and paint were required to obtain a smooth finish. The cockpit cowling is in two halves. Tamiya provide a spacing part B11 to keep the halves apart with the right spacing. The prominant join line down the middle required a small amount of filler and paint to make smooth. All the chrome parts except the mirrors were dechromed with bleach and repainted with Silver. This allows defects to be cleaned up as well as looking more realistic to my eye.
 |
Engine and completed transmission. Wires are used for the spark plug leads. |
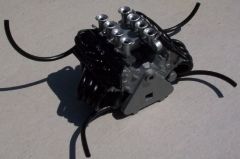 |
Completed engine. The vinyl hoses are for cooling the engine. |
The instructions are quite good with information for painting of the parts, but some detail is omitted. To fill in the missing paint detail I used the 1/12 P34 instructions from Hobby Grand Prix. The fire extinguisher in the body B12 should be Gloss Red. The rear uprights (C11, C13, C31, C32) are shown as Gloss Black with Matt Black axles in the 1/20 instructions, but with Matt Black with Aluminium and Chrome axles in the 1/12 instructions. I'm not sure which is right, but I painted my kit with the 1/20 inctructions. No colour is shown for part C23 in the transmission, but this should be Aluminium according to the 1/12 instructions. As I did not have the 1/12 instructions then, I took a guess and painted my part Gloss Black! The front lip of the front spoiler should be Satin Black.
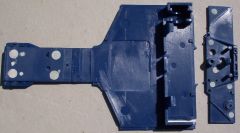 |
The chassis and firewall. Note the battery compartment and punch marks. |
 |
Body and chassis after spraying undercoat and other parts being prepared. |
The 1/12 and 1/20 instructions don't have any instructions for painting the inside of the cowling or body. There is a photo of a model under construction showing underneath the body in the instructions. However, as the photo is in black and white, it is not much use. Using a photo I found at 20832.com, the inside of the cowling should be Satin Black. I could not find photos for under the body, so I decided to also paint this Satin Black. After completing the rear wing stay, I noticed that the rear light cover C29 is painted Gloss Blue in the 1/12 instructions. This part is shown as Matt Black in the 1/20 instructions. I could not find a good photo of this area, so I left my kit as Matt Black. The Goodyear markings on the tyres were painted Satin White.
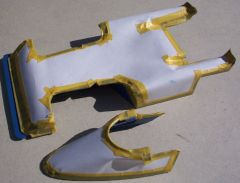 |
The body and cowling masked up prior to painting Satin Black. |
The Aluminium parts of the body were first sprayed with Humbrol 27001 Aluminium. This was then masked up to spray the body Gloss Blue. I used an equal mixture of H14 French Blue (which is too light) and H15 Midnight Blue (which is too dark). Another alternative is Tamiya spray TS-15 Blue. After spraying the Gloss Blue, the body was further masked and the remaining areas sprayed Satin Black. While removing the masking, some the blue paint lifted off in the area behind the right front wheels. I touched this up with blue paint, but as the area was fairly large, I was not too happy with the finish.
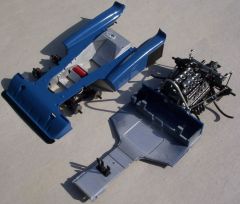 |
The completed body and chassis. |
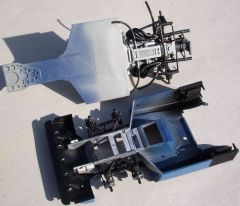 |
The completed body and chassis from underneath. |
After glueing the chassis to the body, the undertray was painted with Humbrol 27001 Aluminium. This was a long and tedious process. I list the steps involved below, each step taking at last a day, mostly to let paint dry.
- Mask body, engine and transmission. Fill gaps with putty and sand.
- Fill gaps with paint and sand.
- Spray undercoat.
- Spray Aluminium. Polish Aluminium half hour later as per instructions, but find paint has not yet dried!
- Let dry and resand.
- Spray undercoat.
- Spray two coats of Klear (Future).
- Spray Aluminium. Polish Aluminium three hours later.
- Decided to fix blue area I had touched up. Undertray was masked and masking removed next to body. This was sanded down and sprayed.
- I was not satisfied with the result, so I sanded down again and resprayed.
- Start removing masking, but find that Aluminium finish is still soft and scratches. Try to polish, but this only removes more paint! Remove Aluminium using rag dipped in white spirits. Fortunately, Klear coat underneath protects undercoat. Spray Aluminium.
- Spray two coats of Klear. This darkens the Aluminium, but I get a nice hard satin finish.
After finally getting a nice finish for the undertray, I was able to finish the model in only a weekend! The remaining parts were glued on and the decals applied. After 26 years, the decals had not yellowed at all and were like new. The only trouble I had was applying the yellow stripes to the body. The elf symbol needs to be as close to the body edge and the yellow stripe as close to elf symbol as you can get. Otherwise, you get creasing trying to match the body stripes to the stripes on the rear cowling. I used Microscale decal setting solution to try and get the decals to "bend" but without much luck. I tried cutting the left decal, but this only made it worse. I covered the resulting gap with some spare yellow striping that was on the sheet.
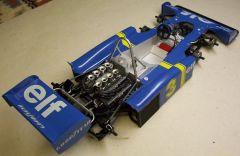 |
The completed model with the wheels and cowlings off. |
Conclusions
I am immensely satisfied to have finally finished my Tyrrell Six Wheeler. It took me a long time to get done, but I think it looks great. These Tamiya kits have great detail. As it is a 1970's tooling, there are some imperfections that need a little work to fix, but its no big deal compared to other kits I have done. Whoever said that F-1 cars are boring need to get a Tamiya kit to see what they are missing.
References
20832.com
Hobby Grand Prix
.
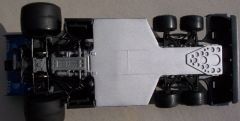 | The undertray from Hell! |


